
Zurb开发的第5版本Foundation(简称为Foundation 5)使得顶部工具栏表现为非常突出,出色的顶部工具栏差不多成为一个由Foundation搭建起来网站的象征元素。今天我们将学习如何通过不同方式去实现它,把它放置在页面的其他地方,让你拥有自定义样式和响应式的水平导航菜单。
首先我们将需要最新版本的Foundation。解压源码包并且把所有的文件放置在你的工程或者测试目录下。我们将直接使用index.html文件,创建一个style.css样式文件将用来重写顶部工具栏的样式来达到自定义导航栏效果。
搭起HTML结构
第一步:常用的模板
index.html文件里面已经预包含一些HTML代码。你可以保留<header>里面的代码,也可以保留所有的脚本(JavaScript)链接(放置在</body>标签之前)。保留这些来确保Foundation的网格系统和顶部工具栏可以运行起来。
你可以删掉其他内容代码,我们将采用一种全部宽度的设计,这不是很复杂的,只是需要想到更好的办法来处理它。
好的,我们将编写header、导航、主内容和footer区域的内容,我们将给每个区域都添加class="full-width",然后再添加一个块元素 <div class="row">,块元素里面再添加一个块元素<div class="large-12 columns">,这也就是搭起基本的网格结构。
备注:更多关于网格系统如何运行的,可以回顾教程第二章:【第二章】WEB前端框架-Foundation之网格系统
<!-- HEADER AREA -->
<header class="full-width header-area">
<div class="row">
<div class="large-12 columns">
<h2>Foundation-4 Custom Top Bar</h2>
</div>
</div>
</header>
<!-- NAVIGATION AREA -->
<div class="full-width navigation-area">
<div class="row">
<div class="large-12 columns">
<nav class="top-bar"></nav>
</div>
</div>
</div>
<!-- CONTENT AREA -->
<div class="full-width content-area">
<div class="row">
<div class="large-12 columns">
<p>Lorem ipsum dolor sit amet, consectetur adipisicing elit. Harum, asperiores, voluptas, veniam commodi impedit tenetur dolores cumque facere explicabo esse quaerat veritatis laboriosam eius modi amet maxime non officia nemo? Iste, quisquam, voluptatum, dolor nam reiciendis unde aliquam numquam necessitatibus odio et perspiciatis facere nihil inventore ullam aspernatur corporis veritatis quia dolorum? Sed, hic, eos quis quibusdam eum aut optio repudiandae at! Eligendi, neque ratione alias enim quae magnam dolores esse pariatur earum laborum reiciendis nobis sunt sequi sapiente ducimus iure ipsam. Sapiente, minima, rerum, facere quos saepe pariatur magni dolorem cum amet nemo quis laborum ipsa dignissimos ducimus inventore modi rem cumque quibusdam quam asperiores! Optio, nobis suscipit molestias voluptas veritatis aspernatur accusamus excepturi rem quaerat impedit animi voluptate at facilis aliquid cum fugit labore omnis provident recusandae autem. Doloribus, mollitia quos officiis quas sapiente nam dolor praesentium maxime cupiditate illum? Rem, esse, nulla vitae adipisci sequi deleniti quasi!</p>
</div>
</div>
</div>
<!-- FOOTER AREA -->
<div class="full-width footer-area">
<div class="row">
<div class="large-12 columns">© 2014</div>
</div>
</div>
第二步:顶部工具栏标记
在编写样式之前,我们需要编写出一些必须的HTML结构代码使得Foundation顶部工具栏能够正确地运行起来。因此需要5样基础元素使得引擎跑起来。
<nav class="top-bar">
<ul class="title-area">
<li class="toggle-topbar"> = 为了增强在手机布局上的菜单。
<section class="top-bar-section">
<ul class="left">和<ul class="right">
现在我们用这5样基础元素来搭建基础框架并且实现功能。
备注:在此教程例子中,我们将创建一个自定义的导航菜单,因此删除一些包括logo、文本和图片的标题。因此从下面代码例子可以看到在块元素<ul class="title-area">里的<li class="name"></li>里面是空的。
接着,我们来添加一些菜单元素和一个下拉菜单代码,在你想添加下拉菜单的li元素里添加class="has-dropdown",然后在里面包含下拉菜单代码 <ul class="dropdown">...</ul>。如果想表示当前使用状态的li,则需要添加”active”。<ul class="right"><ul>里面可以为空的,嵌入代码中。一般情况下,你将会在这个空的ul里添加一个按钮或者搜索栏。更多关于顶部工具栏,可看上一篇教程:初学者学习foundation:顶部工具栏
如下HTML代码示例,其中的注释会帮助你理解整体是如何运作的。
<!-- Nav Wrap -->
<nav class="top-bar">
<ul class="title-area">
<!-- Title Area -->
<li class="name"></li>
<!-- Remove the class "menu-icon" to get rid of menu icon. Take out "Menu" to just have icon alone -->
<li class="toggle-topbar menu-icon"><a href="#"><span>Menu</span></a></li>
</ul>
<!-- The Section wrap -->
<section class="top-bar-section">
<!-- Left Nav Section -->
<ul class="left">
<li class="active"><a href="#">Home</a></li>
<li><a href="#">About us</a></li>
<li><a href="#">Our products</a></li>
<li><a href="#">Portfolio</a></li>
<li><a href="#">Blog</a></li>
<li><a href="#">Prices</a></li>
<li class="has-dropdown">
<a href="#">Features</a>
<ul class="dropdown">
<li><a href="#">Modalboxes</a></li>
<li><a href="#">Submenu's and navigation</a></li>
<li><a href="#">Price tables</a></li>
<li><a href="#">Buttons</a></li>
<li><a href="#">Button groups</a></li>
<li><a href="#">Labels, Keystrokes and Tooltips</a></li>
<li><a href="#">Alert boxes</a></li>
<li><a href="#">Columns</a></li>
</ul>
</li>
<li><a href="#">Contact</a></li>
</ul>
<!-- Right Nav Section -->
<ul class="right"></ul>
</section>
</nav>
第三步:目前效果
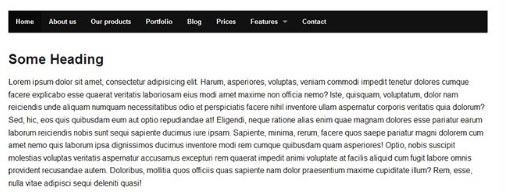
现在可以在你的浏览器上看到目前的效果,基于Foundation框架使用顶部工具栏我们已经创建一个水平菜单。为了方便把菜单放置到其他地方,而不是固定在浏览器的顶部,我们需要在以上代码外层添加网格的<div>。
当你在调整浏览器窗口时,会发现菜单栏在预先设定的断点发生改变。
接下来着手编写自定义样式,将关注如何去编写顶部工具栏的样式和可以使用哪些class。
编写CSS
第一步:通用样式
如果你还没做好准备,可以创建一个css文件,命名为style.css并且放置到下载下来的Foundation工程下css文件夹下。但别忘记把此引用到index.html文件里。如下代码示例:
<head>
<meta charset="utf-8">
<meta name="viewport" content="width=device-width">
<title>Foundation 4</title>
<link rel="stylesheet" href="css/foundation.css">
<link rel="stylesheet" href="css/style.css">
<script src="js/vendor/custom.modernizr.js"></script>
</head>
这里如果你不把style.css放置在foundation.css下面,将不会覆盖原来顶部工具栏的样式。
很好,接下来我们要为header、导航、内容和footer写一些基础样式,如导航块,我们将添加一张已经下载好的背景图。这些通用样式一般不是很难去实现的,见如下代码示例,我们添加一个class”full-width”到每个区域中,以致于每个区域的宽度都是占满浏览器宽度的。
body {
background-color: #ccc;
}
/** Set the backgrounds for the different sections **/
.header-area {
background-color: #2d465c;
min-height: 160px;
}
.navigation-area {
background-image: url('../img/navigation-container.jpg');
background-repeat: repeat-x;
}
.content-area {
padding: 50px 0 70px 0;
}
.footer-area {
background-color: #1f1f1f;
color: #fff;
min-height: 50px;
padding: 20px 0 0 0;
}
.full-width {
min-width:100%;
position: relative;
}
h2 {
color: #fff;
font-weight: normal;
margin-top: 50px;
}
第二部:顶部工具栏样式
现在看一下效果,会发现菜单会往外偏移一点,原因就是使用默认的样式,接下来修复这个问题!
有一些样式类是需要修改以达到想要的效果。首先,我们将在.top-bar和.top-bar-section li里移除黑背景,改变height(在导航区域内)和line-height为58px。如下代码,可看注释帮助理解。
/** Changes background color, height and margin of the border **/
.top-bar {
background: none;
height: 58px;
line-height: 58px;
margin-bottom: 0;
}
/** Removes black background on menu bar **/
.top-bar-section ul {
background: none;
text-transform: uppercase;
}
/** Removes black background on menu item **/
.top-bar-section li a:not(.button) {
background: none;
line-height: 58px;
padding: 0 27px;
}
我们已经移除黑背景了,并且适应高度、行高和内边距,将文字转化为大写字母,这些都是为了适应我们自定义设计。
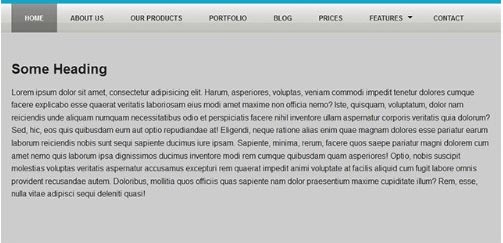
如果你进行刷新页面,可以看到出现雏形了,我们继续编写下拉菜单、菜单子项目、激活(active)和鼠标悬空(hover)的状态的样式吧。继续往下看代码示例,并阅读注释:
/** Changes the active menu item from default black to a gradient **/
.top-bar-section ul li.active > a {
background: rgb(0, 0, 0);
background: linear-gradient(to bottombottom, rgba(0, 0, 0, 0.4) 0%, rgba(0, 0, 0, 0.7) 100%) repeat scroll 0 0 transparent;
color: #fff;
}
/** Changes the hover state of non active menu items **/
.top-bar-section li:hover a {
background: linear-gradient(to bottombottom, rgba(0, 0, 0, 0.4) 0%, rgba(0, 0, 0, 0.7) 100%) repeat scroll 0 0 transparent;
color: #fff;
}
/** Changes non active menu items text color to black **/
.top-bar-section ul li > a {
color: #2d2d2d;
}
/** Changes the hover state of dropdown menu items **/
.top-bar-section ul.dropdown li a:hover:not(.button) {
background: none repeat scroll 0 0 rgba(0, 0, 0, 0.9);
}
/** IMPORTANT fill for the ul dropdown container **/
.top-bar-section ul.dropdown {
background: #333;
color: #fff;
}
/** This fixes the position and the color of the dropdown arrow **/
.top-bar-section .has-dropdown > a:after {
border-color: rgba(0, 0, 0, 1) transparent transparent;
margin-top: 2.5px;
}
我们已经改变菜单的好几个地方(样式),如首先,我们就改变激活(active)菜单默认的黑背景为“CSS渐变”,接着给不激活菜单添加hover状态,并改变里面的文字颜色为深灰色,目的是显示得更为清晰。然后.top-bar-section li:hover 的样式将使得下拉菜单里的子项目被鼠标悬空时显示特定效果。为了完善样式,我们ul.dropdown添加一个背景颜色和重新设置下拉菜单箭头的位置,是因为我们内边距适应.top-bar-section。
第三步:效果
重新刷新页面,看一下现在的效果,我们还没完成样式的编写,只是想看看当调整浏览器的大小时(甚至在更小的屏幕上),页面效果是否显示正常。接下来我们将添加“媒体查询”代码来实现这种效果。
编写媒体查询
第一步:媒体查询
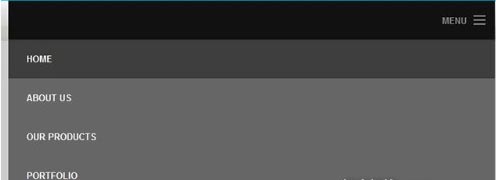
我们需要做些操作来使得使用我们自定义样式的菜单栏能够适应不断缩小的屏幕。这里主要涉及到添加一些内边距、行高、文本颜色和背景颜色。如下CSS代码示例,查看每个section的注释。
@media only screen and (max-width: 942px) {
/* Makes the responsive menu fit in the navigation container and change its background to black */
.top-bar ul {
background-color: rgba(0, 0, 0, 0.5);
padding-bottom: 13px;
}
/* Change non active menu item color to black */
.top-bar-section ul li > a {
color: #fff;
}
/* Gives the dropdown ul a black fill */
.top-bar-section ul {
background: #000;
}
/* Give the BACK button after going in a submenu the appropriate filling */
.top-bar-section .dropdown li.title h5 a {
line-height: 57px;
}
/* This fixes the position and the color of the dropdown arrow */
.top-bar-section .has-dropdown > a:after {
border-color: rgba(255, 255, 255, 1) transparent transparent;
margin-top: 2.5px;
}
} /* end media query */
第二步:享受你的效果
保存文件,然后重新刷新页面,不断地调整浏览器窗口的大小,你就会看到菜单栏都能很好地展示出来。
总结
最后,总结一下此教程:我们如何利用Foundation5框架里的顶部工具栏来创建一个自定义菜单。需要记住的一点是,菜单栏不一定要被放置在页面的顶部的,可以使用网格系统来包含它,然后就可以放置任何你想放置的地方。
Foundation是一系列非常有用的工具可以快速地创建起响应式网站设计,当你不断地熟悉Foundation这个框架,就可以更高效地、创意地创建出更多好玩的东西出来,继续努力吧!




网友评论文明上网理性发言已有0人参与
发表评论: